2018.09.25 - Bread on the Cobb II
I was able to try out my new Cobb box at the weekend at our last event of the season. We had a great set up camp-wise, two minibuses parked side-by-side 3 metres apart and a 6m x 4m tarpaulin stretched between them both tied to the outer roof bars. It worked very well.
As for the Cobb box, that was pretty good but it does need some adjustments. Firstly, a small table needs to go right alongside, preferably over the open box section. Secondly the wind breaks were too narrow and it restricted access to the Cobb itself. Still, both of these are solvable problems.
I also baked bread over the weekend. I made a loaf on Saturday for lunch with cold cuts, chese and fruit and then had to make a second loaf on the Sunday as we ate the rest of the first loaf with the Beef Stew for Saturday dinner. Baking the bread in the Cobb works fine, the problem with bread making in camp is proofing the dough. Ideally you need a temperature around 27 Celsius and last weekend we were lucky to get more than 15 Celsius. Consequently, the dough took a long time to rise sufficiently.
So, I need to find a way to maintain the correct temperature somehow for proofing the dough. Could be interesting...
2018.09.15 - Completing the Cobb Box Construction
One of the tasks for the day was competing the Cobb box construction. I had made the inner box and accessory rack yesterday and the glue had set overnight so all the remained was to make the inner box fit snugly. This comprised two parts. Firstly removing some of the screws that stood proud of the inner box and the inside of the main box and secondly removing some of the other part of the inner box so that it cleared the right-angle braces fitted to the main box. I should have recessed these into the plywood before I glued the box together, but the brackets were a bit of an after thought so I wasn't able to do this. I dare say that a good carpenter would be able to achieve this without much effort but I'm not one of those.

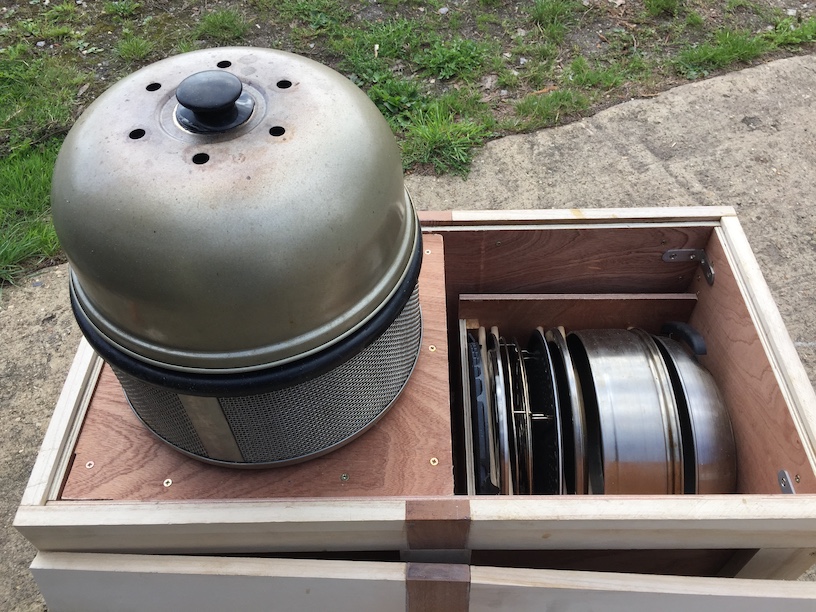
So, here is the box.

And on the inside everything fits into its place. The Cobb could be used in this position but it is probably not a good idea.

The accessory rack allows each of the accessories to be easily removed when required.
The inner box can be turned upside down to provide a more practical way to use the Cobb...

...but if more height is required then the inner box can be rotated through 90 degrees so that it sits securely in a higher position. The two white strips on the inner box are where I have removed about 2mm of the plywood.
I need to do a little finishing before it can be used, sanding off some rough edges, strengthening the inner box with epoxy and cutting some air and finger holes in it as well. Then next week I'll use it for the last event of the season and see how it works. Any adjustments can be made before the final finishing and painting.
2018.09.09 - More on the New Medieval Boxes
The task for the day was to glue up at least the new Cobb box and I spent three hours doing that. The box had to be dismantled making sure to remember where each part went, then mix up small batches of epoxy, then the appropriate part of each piece was covered in epoxy and the piece screwed back in place. The four side were epoxied together using screws and cramps to hold the box to other and finally the bottom was epoxied in place and a fillet of epoxy put around the edge of the underside of the base.
I used some right-angled brackets to hold the sides together and the cramps on the outside could be removed.
I decided that glueing up the second box was going to be a little over the top considering that it will not be holding a lot of weight so I used the right-angle brackets on this box and screwed the bottom in place. If it ever looks like it is coming part then I'll glue it up.

The Cobb box glued p and waiting for the epoxy to cure.

The bead of epoxy on the underside of the bottom should give it a lot of additional support.

The right angle bracket in place in one of the corners of the clothes box.
2018.09.08 - Bread on the Cobb
Whilst I was busy making the new medieval boxes I was also working on another task for the day, this time making some bread and using the Cobb to cook it. I used the Turbo, No-Knead bread recipe and set the Cobb alight when the bread was put aside for the second proof.

I put the lit Cobb in the wet room so that it was out of the wind which is quite important when cooking on a Cobb.

The bread took about twice all long to cook than when using a conventional oven but as you ca see from the above photo, the result was not at all bad.

The crust is not as brown as previous loaves but that might have been my putting the bread in to cook before the Cobb was properly up to temperature.

The crumb is more like a conventional loaf and it is a lot softer than the previous loaves but still very tasty.
I'd judge this one a success.
2018.09.08 - New Medieval Boxes
This weekend's task, or one of them at least, is to make two new medieval boxes, one to hold the Cobb and its accessories and the other will become the clothes box. The current clothes box will be repurposed as the kitchen box and the old, smaller and falling apart kitchen box will be left in the container as storage for the kitchen equipment that is not being taken on a particular event.
I did make a Cobb box a few years ago, June 2010 according to my records but it was quickly hijacked into being a non-Cobb box with a gas stove and a container for various other things.

Here it is today, battered and work but still used regularly and still gong string more that 8 years on. It is, however quite heavy. The new Cobb box is going to be exactly the same internal dimensions except the width which will be about 4" or 10cm longer. This will make the external width 30" and two boxes like this should just fit in to the minibus across the width of the car behind the front seats. However, instead of plywood & pine I'll be using plywood & Paulownia which is much lighter that pine but just as strong.
Firstly I had to get the plywood for the boxes so a quick trip to Stoke Ferry Timber, they open at 08:00 on a Saturday, got me the plywood and they cut one sheet up into three pieces 14 1/2" wide by 8' long with a piece about 4" wide left over.

I have some Paulownia left over from the batch sent to me by our late friend Thomas which will be used for the outer bit of the boxes.

I have 3 1/2 sheets of it left 40cm wide and 100cm long and it is 18mm wide.

Here is the Paulownia cut up.

I didn't have enough to get all the parts out in one piece, so some of the part are made up of several smaller pieces.

And these mahogany pieces? Well, I messed up the measurements for the 8 long pieces you can see in the photo, they are too short by about 36mm and I don't have enough Paulownia to cut new ones, so I'm going to do what all good carpenters do when face with such a situation, I'm going to make the mistake into a feature. The too short piece will be cut in two and the mahogany inserted in the middle.

I didn't measure each piece and then cut it to length, instead I measured and cut the first piece, then used the gas bottle as a stop and subsequent pieces were put on to the mitre saw with one end resting against the gas bottle and the cut made. The result was several pieces of the same length without multiple measuring.

The next job was to cut the plywood pieces. Eight large pieces to form the top, bottom and the two long sides and four shorter pieces to form the ends.

Here is one side assembled with the feature inserts correcting the error.

Several hours later fount side and four ends ready to be put together.

Here is the bottom loosely held in place which give the box some rigidity whilst woking on other bits.

It is just tacked in place with some nails for now.

The corners have been cut off to allow dust and other bits to be swept out without having to turn the box upside down.

It's always good when things fit as they should. Both the bottom and the top, shown here, were a snug fit.

So, two boxes and just the lids to finish.

And here they are. Two almost identical boxes. A good day's work.
Mind you, I'll be taking them both apart tomorrow first thing and glueing them back together again!