2021.09.05 - What Else Can Go Wrong?
Most projects I undertake go reasonably well, occasionally really well and very rarely with no errors at all.
Other days are not so good.
I decided that I really needed to make the two final drawers for the sharpening station I made a while back.

This is the unit as I left it and you can clearly see the space where the two drawers will go. At the time I didn't need the drawers so I didn't make them. Since then, however, I have bought a couple of additional sharpening jigs and need somewhere to put them, so it's time to make the remaining drawers.
Going to be easy enough, just measure one of the existing drawers for the width and depth, measure the height of the gap and divide that by two to get the height of each drawer. I used some left over particle board to make the frame and some OSB for the bottom. Easy, no?
Well, no.

I measured not once, not twice not even three times but four or more and I still cut made the drawers too deep. So I cut some off the front as the board used was 3/4" (19mm) thick. But that wasn't enough, so I cut some off the back. That wasn't enough either.

Some off the front.

Some off the back.
I don't know what I was doing but each time I measured at least twice and each time I still got it wrong.

In the end I cut a piece 3/4"(19mm) out of the middle of the drawer and glued the two bits back together again. You can see the join in the photo above.
Now it fits.

Well, it fits depth-wise, but I'd also made the drawers too narrow. You can see the darker padding piece glued onto the side the drawer in the photo above. So that made it fit width-wise.

Even then the tale of woe does not end as both drawers were too tall and I had to cut about 1/4"(6mm) off the top. You can see the cut piece above.
That should be it, yes? Surely now the tale of woe is done?
No.
I ordered one set of drawer slides.
I needed two.
So I fitted the one drawer and will order another set of slides later in the month when funds allow.
But, for this project I'm still wondering...
...what else can go wrong?
2021.08.08 - More Glastonbury Chairs
I was commissioned to make two Glastonbury Chairs by re-enactor friends. I haven't recorded the build process as I've done that already, so here are the results.

The parts awaiting a final sanding.

But first, a test. The chair. on the left looks a little skewed but that is distortion from the camera, not the chair itself.

Seen from this angle, there is no distortion.

I made these slightly differently from previous chairs in that all the edges of the frame pieces were rounded over with a router bit to remove the corners the wood. Pine isoprene to splitting along sharp edges like this and the round over helps to prevent this from happening.

The result is pretty good and I think the recipient's will be pleased.
2021.08.08 - Woodworm
Tina discovered that the "Treasure Chest' style box in which she keeps various lengths of cloth for making things was riddled with woodworm. The box was immediately taken outside and we inspected the damage.
The box was made of plywood, fairly good quality but not top quality, with a thin veneer on the outside so that it looked as though it was made from solid wood.
The plywood easily delaminated as we deconstructed the box.

This is what we found. One of the inner veneers the plywood was just dust where it had been eaten away by the woodworm.The four black things you can see in the photo are dead worms. I removed the hardware from the box and put the remainder on the burn pile.
So, I now needed to make a new box for Tina's material.
We visited our local timber merchant and bought an 8 x 4 sheet of marine plywood, not BS1088 so it wasn't expensive, and a whole load of pine for another job whilst we were there.
I didn't photograph the building of the box, it's just six panels cut out of the plywood sheet and glued together with mitre joints reinforced with square batten on the inside.

Here is the result. Tina asked for a box of similar size to the old on, but not so long since that made it difficult for one person to carry. I used the hardware from the old box on the new one and it's not too bad.

However, it does look like a box made of plywood and having the posh handles and latch does make it look slightly strange, but it will do the job.

The jam jar is filled with wood oil, Danish Oil I think, and Tina is going to use that on the interior and maybe paint the outside later.

We found some hooks and chains that we used to prevent the lid from opening too far and straining the hinges.

A strange combination of modern over centre latch with a hand-forged level welded to the modern bit and a hard-forged hook to make it look "traditional". But, as I said, it does the job.
2021.05.29 - Adjusting the Table Saw II
My aim was to complete the adjustment of the table saw so that by the end of the day these was back in the workbench and operational. There was a fair bit of preparation work still to do but I think it is a reasonable;e target for the day.

The first order of the day was to add a vertical timber to the bench to support the new skeleton base.

Then it was time to measure and mark out where the cross members of the new base will go. This required several measurements to ensure that they were correct.

The adjusters are made from thick plywood. Here you can see the T-Nuts that will allow the 10mm bolts to raise and lower the new bed.

The sides were laminated so that the screws will be running through the sides and not through the end grain.

For convenience, the sides were added before being cut as it is difficult to put cramps on a sloped surface.

While the glue was drying I cut and put on the side panel.

The adjusters were then cut apart so that there are four, one for each corner.

They are not pretty, but they are robust.

Here is a close up of one of the adjusters. The slot prevents the new bed from moving forward or backward and the bolt lifts the bed. The nut on the top is used to tighten the adjusting bolt once the correct level is reached.

Two adjusters on one side...

And two on the other.
The new bed fits into the adjuster slots but not snugly. A tight fit would prevent the adjusters from working properly.

A piece of thin steel is glued to the bottom of the bed to prevent the bolt from gradually making a hole in the particle board.

The table saw now back in the workbench, properly adjusted and with nothing to stop the sawdust from falling to the ground.
Great.
Time to call it a day, methinks.
2021.05.28 - Adjusting the Table Saw
There are many videos on the InterWeb showing how the adjust a table saw and why. There are even a few specifically for the table saw I have, which makes life easy. So I'll not into detail about how to do it as it is of no interest unless you need to carry out the procedure.

This is my table saw with the back panel removed.

And these are the two hex-bolts that need to be loosened. You can get to them without removing the panel, but you can't tap the mechanism with a mallet. So I loosened the bolts, tapped in the appropriate place and nothing happened. The mechanism stayed right where it was. Eventually I loosened the two matching hex-bolts at the front of the saw and then I could make the adjustment. I got it as good as I could without building a dial-gauge based jig, but I don't have all the parts for that right now, so it will have to wait. Nevertheless, it is better than it was.

Having tightened the bolts and put the back cover on, I turned my attention to how to adjust the level of the table saw bed to be flush with the workbench. Here you can see that I have removed the old support.

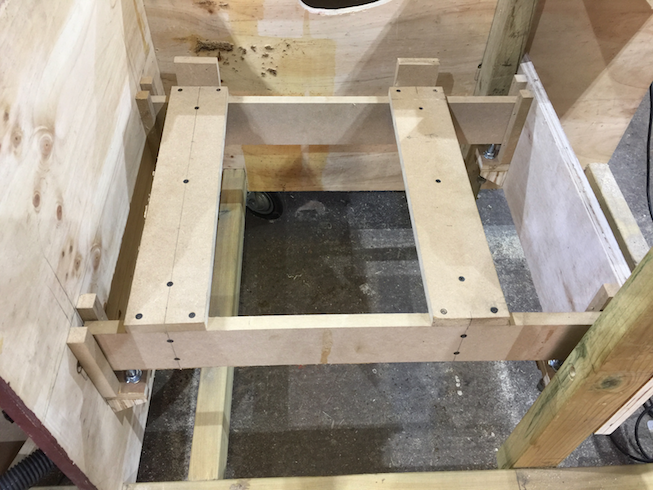
I used various parts of the old bed to make a new skeleton bed. The two pieces you can see running front to back will allow me to put the back feet of the saw onto the front of the bed and then slide it into place. These fore and aft supports have another piece underneath at right angles like the two cross members to increase the carrying capacity. The two raised pieces at the back of the bed are there to prevent the saw from sliding too far. The probably won't be necessary but it doesn't hurt to put them in place.

Having screwed the new bed together I put the table saw on it to check the fit. I'll not glue anything in place for the moment in case I need to take it apart to modify it in some way. This is the side view of the saw and bed and you can see the strengthening braces under the supports along which the saw will slide.

The front view.

And a view showing the saw up against one of the rear stops. So far, so good.
Tomorrow I shall turn my hand to the workbench and put in the supports upon which the new bed will rest and the adjusters that will allow each corner of the bed to be raised or lowered a little so that the surface of the saw can be made flush with the the surface of the workbench.
But for now, I'm done and it's time to finish.